
One of my New Years Resolutions is to attend more events to promote my business, such as trade shows, craft fairs etc so I thought I would show you this tutorial that I made last year for a fabulously sparkly DIY jewellery display made out of any old photo frame. It’s great for displaying your jewellery at home or even at craft markets and fairs and cost me about £3 to make!

You will need:
- Old Photo Frame (I actually picked 2 of these up from the 99p shop – they are very cheap and thin plastic but you can’t tell once they are painted)
- Acrylic Paint – 2 contrasting colours of your choice
- Glitter to match one of your paint colours.
- PVA Glue
- Gloss Varnish (Optional)
- Newspaper (to cover your work area)
- Paint brushes and a jar of clean water


Instructions:
- First of all, cover the area you are working on in newspaper. It’s about to get a whole lot of messy up in here!
- Take apart the photo frame, you won’t need the glass so put this somewhere safe (*CRAFTER TOP TIP: You can use the glass for your product photos by placing it over a white sheet of paper to create a nice shiny white background for your images)
- Take the frame and paint it in the colour of your choice – I chose a really bright blue colour. Wait for this to dry (I left it an hour as I have really quick drying acrylic paints and got on with the next step whilst I was waiting for it to dry)
- Once your frame has dried you can paint a layer of gloss varnish over the top. This is an optional step but it creates a nicer finish and will also make your frame more durable to wear and tear.
- Take the back of the frame (in this case mine is made of cheap cardboard type stuff) and paint it in your contrasting colour. I chose a bright hot pink that matched my pink glitter. Wait for the paint to dry fully before continuing to the next step.
- Once the paint has dried, cover the whole backing board with a think layer of PVA glue.
- Sprinkle (I love that word) a thick later of glitter all over the glue until the whole thing is covered. Make sure there are no gaps. Leave to dry overnight.
- Once your glitter background is completely dry, you can shake all of the excess glitter off. I usually do this by turning it upside down and knocking quite hard on the back. Make sure you have newspaper underneath, this way you can collect the leftover glitter and funnel it back into your pot (Waste not, want not!)
- Cover the glitter background in a thin layer of PVA glue. Don’t worry – It will dry clear! This just acts as a sealant so you won’t be covered in glitter every time you touch the frame. Leave this to dry fully overnight.
- Now you can put the frame back together without the glass. Leave the clips at the top open so that you can slide your jewellery in and secure it. Do not fasten the top clips onto your jewellery chain as this will damage it. The chain should be held in place as it is, but if you’re frame is a bit loose, you can put a drawing pin in the back of the board and hook your necklace chain over it so it won’t slip down, or use the slits to keep it secure.

Taadaa! A lovely, super bright and eye catching glittery jewellery display.
I’ve just got one necklace in mine, but you could add more by using the pin method above. Just place the pins in different places on the back of your board and your jewellery will hang at different lengths in the picture frame.
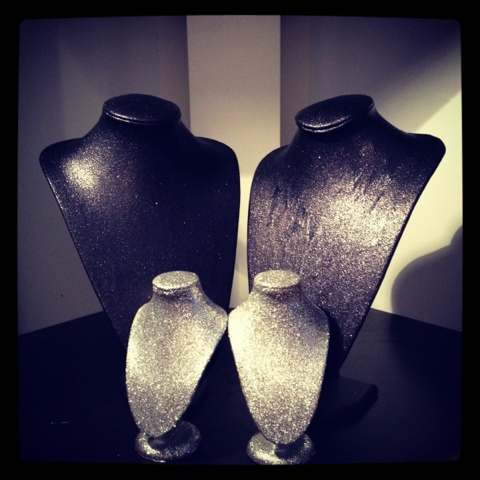
Here’s some more display stands that I made to give you some other ideas of what you could do with yours…
These old mini jewellery busts started off as a manky brown suede. Nothing a bit of glitter can't fix!



I hope this post has inspired you to make your own jewellery displays a little more interesting. Especially if you are like me and you sell at craft markets and events. Afterall, first impressions count!
Hayley xo


